
WARNING: Do not re-encode an already-compressed audio/Lossy Audio like AAC/AC3/DTS/DTS-HR/E-AC3. This is transcoding. Re-encoding only significantly worsens quality. You should only encode from lossless sources.
Encodes with eac3to suffers from clipping in multiple timestraps also significantly worsens surround channels.
Firstly, Audio channels are the most important factor which is to be considered first. There are varieties of options you can choose but this guide will be mostly for newcomers who are learning and this is what is considered proper in the P2P world. Here's a chart of audio that is used with encodes below :
Quick view:
Commentary Audio : Opus / AAC
Mono/Stereo Audio (1.0/2.0) : AAC / FLAC (For HD Only)
Surround Audio (2.1 and above) : AC3 / DTS (Core) / E-AC3
Detailed Chart:
+--------------------------------------------------------------------------------+
| Source | Channels || Encode Resolution |
| Audio type | /Bitrate || 2160p | 1080p | 720p | 576p/480p |
+--------------------------------------------------------------------------------+
| Lossless | Object% || Source% | EAC3/AC3 | 5.1 640 AC3 | 5.1 448 AC3 |
| Lossless | 6.1/7.1 || Source/EAC3 | EAC3/AC3 | 5.1 640 AC3 | 5.1 448 AC3 |
| Lossless | Surround || Source/DTS | 640 AC3/DTS | 5.1 640 AC3 | 5.1 448 AC3 |
| Lossless | 1.0/2.0 || FLAC | FLAC/AAC | FLAC/AAC | AAC |
| Lossy | Any || Leave | Leave | Leave | Leave |
| Commentary&| => 320 || AAC/Opus | AAC/Opus | AAC/Opus | AAC/Opus |
| Commentary&| < 320 || Leave | Leave | Leave | Leave |
+--------------------------------------------------------------------------------+
Source/Leave indicates leaving the untouched audio.
% -> Atmos or DTS-X
*Incase if source is LPCM/PCM do convert them to DTS-HD MA.
1. Mono/Stereo Audio Encoding:
AAC with Qaac:
AAC is an advanced lossy audio codec, which is well-suited for encoding 2.0 audio, achieving transparency at around 180 kbps.
For Mono/Stereo Audio encodes Qaac is vastly used and delivers the most proper size/quality ratio among all. Instead of choosing a fixed bitrate we set quality and delivers the most compressed and better quality track than eac3to or other encoders.
Qaac uses Apple's implementation of the AAC encoder, which is currently considered to be superior to Nero's AAC encoder at low bitrates. This makes qaac especially desirable for encoding commentary tracks.
Qaac Installation
> eac3to
> Apple Application Support x86 (updated: Feb 2017) (You can also extract it from the iTunes Installer yourself using 7-zip.)
> qaac x86
Install Apple Application Support first. This will enable qaac to use Apple's official library to encode AAC files.
After extracting qaac it is a good idea to add it to your system PATH so it can be called from any directory. On Windows 10:

Click OK to save the settings.
Test if qaac is correctly installed and added to your PATH by opening the command prompt (cmd.exe) and typing
If you see
then it has been installed correctly.
How to Use:
Qaac can be used in a single step with eac3to, for example to encode track 4 from BDMV:
You can also use it on a previously demuxed audio track, for example:
-V parameter determines the variable bitrate and therefore quality. There are 15 settings for this parameter, 127 being the highest quality setting:
For main audio, you should use -V 127
For the commentary tracks, you can use -V 73[/code] or less (adjust to 80~90 kbps for stereo audio).
The resulting .m4a file containing the AAC track can be muxed in using mkvmerge as usual.
P.S: If you are a noob like me and loves doing things manually and adding environment variables is extra steps just drag and drop the eac3to.exe , qaac.exe instead. Here's an example how a successful encode looks like :

FLAC with eac3to:For Mono/Stereo Audio encodes Qaac is vastly used and delivers the most proper size/quality ratio among all. Instead of choosing a fixed bitrate we set quality and delivers the most compressed and better quality track than eac3to or other encoders.
Qaac uses Apple's implementation of the AAC encoder, which is currently considered to be superior to Nero's AAC encoder at low bitrates. This makes qaac especially desirable for encoding commentary tracks.
Qaac Installation
> eac3to
> Apple Application Support x86 (updated: Feb 2017) (You can also extract it from the iTunes Installer yourself using 7-zip.)
> qaac x86
Install Apple Application Support first. This will enable qaac to use Apple's official library to encode AAC files.
After extracting qaac it is a good idea to add it to your system PATH so it can be called from any directory. On Windows 10:
Click OK to save the settings.
Quote:
| Note: If you haven't already, it's a good idea to add eac3to to your PATH as well by clicking Edit. |
Test if qaac is correctly installed and added to your PATH by opening the command prompt (cmd.exe) and typing
Code:
| qaac --check |
If you see
Code:
qaac 2.xx, CoreAudioToolbox 7.xx.x.x |
then it has been installed correctly.
How to Use:
Qaac can be used in a single step with eac3to, for example to encode track 4 from BDMV:
Code:
| eac3to BDMV/ 4:stdout.wav | qaac -V 63 -i --no-delay -o commentary-eng.m4a - |
You can also use it on a previously demuxed audio track, for example:
Code:
| eac3to commentary.ac3 stdout.wav | qaac -V 63 -i --no-delay -o commentary-eng.m4a - |
-V parameter determines the variable bitrate and therefore quality. There are 15 settings for this parameter, 127 being the highest quality setting:
Code:
| 0 9 18 27 36 45 54 63 73 82 91 100 109 118 127 |
For main audio, you should use -V 127
For the commentary tracks, you can use -V 73[/code] or less (adjust to 80~90 kbps for stereo audio).
The resulting .m4a file containing the AAC track can be muxed in using mkvmerge as usual.
P.S: If you are a noob like me and loves doing things manually and adding environment variables is extra steps just drag and drop the eac3to.exe , qaac.exe instead. Here's an example how a successful encode looks like :
This is to be done only when the source audio is D Lossless (DTS-HD MA/TrueHD/LPCM/PCM) and you're using it for an HD encode. And converting to FLAC is pretty easy. But make sure you have the latest version of libflac build with your eac3to.
Open cmd.exe then drag and drop eac3to.exe or type eac3to if you have Path added then add a space drag and drop the source audio/file then add a space filename.flac will do the job.
Example: From an extracted audio :

From a sourced muxed/included :

However, there's case where bitrate goes above 800~1000kbps which is bloated for Mono/Stereo audio. So simply add -down16 to forced the bit depth down.
If it fails then add -96000(current sampling rate) -resampleto48000 -down16
Details here - https://en.m.wikibooks.org/wiki/Eac3to/How_to_Use
2. Surround Audio Encoding:Open cmd.exe then drag and drop eac3to.exe or type eac3to if you have Path added then add a space drag and drop the source audio/file then add a space filename.flac will do the job.
Example: From an extracted audio :
From a sourced muxed/included :
However, there's case where bitrate goes above 800~1000kbps which is bloated for Mono/Stereo audio. So simply add -down16 to forced the bit depth down.
Code:
| ..... audio.flac -down16 |
If it fails then add -96000(current sampling rate) -resampleto48000 -down16
Details here - https://en.m.wikibooks.org/wiki/Eac3to/How_to_Use
Extracting DTS Core:
Since the usage of eac3to is explained above already. Keeping this as simple as possible. with eac3to select the source audio (DTS-HD MA/DTS-HR) then filename.dts -core and done.
Example:
AC3 (DD5.1) encoding:Code:
| eac3to audiosource.dtshd filename.dts -core |
Example:
AC3 also known as Dolby Digital is a widely supported multichannel audio codec. On PTP it is typically used for the main audio track of encodes with multi-channel audio.
While eac3to can transcode to AC3 using the aften library, there are concerns that its implementation may not produce the optimal quality of sound. For the best results, it is recommended to use Sony Sound Forge/Surcode Encoder which includes a reference AC3 encoder.
Slightly better way (Sony Sound Forge Pro):While eac3to can transcode to AC3 using the aften library, there are concerns that its implementation may not produce the optimal quality of sound. For the best results, it is recommended to use Sony Sound Forge/Surcode Encoder which includes a reference AC3 encoder.
Installation
> eac3to 3.34
> Sony Sound Forge Pro 11 Build 293 Install the software. Copy-paste the patch to installdir the run it. (Note: versions later than 11 reportedly have broken AC3 encoding.)
How to use:
-> Create a .w64 file from your lossless audio track:
-> Launch Sony Sound Forge and open the output.w64 file you just created.
It will take a few minutes for the audio to be processed. Once completed, go through the audio and highlight a region in the Center channel (usually the third stream in 5.1 sources) that has primarily dialogue (no music or sound effects).

-> Make sure to only select the center channel, otherwise, all six channels will be averaged and you will get an inaccurate value. Then click Process->Normalize.

-> Click the Average RMS level (loudness) radio button and then press Scan Levels. After a few seconds, a value should show up for the RMS (underneath the Scan Levels button). Write down/remember this value. Now click Cancel. Make sure to click Cancel and not OK, otherwise Sound Force will normalize the audio.
Now click File->Save As. Make sure "Dolby Digital AC-3 Pro" is selected and the "5.1 Surround DVD" profile is selected.

Now click the "Custom..." button.

-> On the first tab, make sure the settings match the image. Then set the Dialog normalization to the RMS value you wrote down earlier or -31 dB if it was lower. Select 640 kbps for a 1080p/720p encode or 448 kbps for an SD encode.
Now go to the Preprocessing tab.

-> Tick LFE low-pass filter, Bandwidth low-pass filter and uncheck all the other boxes. Make sure that RF overmodulation protection is unchecked. For the Line mode profile, the recommended value is "Film: Light".
Or> eac3to 3.34
> Sony Sound Forge Pro 11 Build 293 Install the software. Copy-paste the patch to installdir the run it. (Note: versions later than 11 reportedly have broken AC3 encoding.)
How to use:
-> Create a .w64 file from your lossless audio track:
Code:
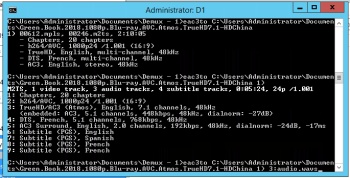
| eac3to.exe e:\example\BDMV\PLAYLIST\01000.mpls M2TS, 2 video tracks, 3 audio tracks, 5 subtitle tracks, 1:42:55, 62.856p 1: Chapters, 20 chapters 2: h264/AVC, 1080p24 /1.001 (16:9) 3: h264/AVC, 480p24 /1.001 (20:11) 4: DTS Master Audio, English, 5.1 channels, 16 bits, 48kHz, -11ms (core: DTS, 5.1 channels, 1509kbps, 48kHz) eac3to e:\example\BDMV\PLAYLIST\01000.mpls 4: e:\example\source\output.w64 |
-> Launch Sony Sound Forge and open the output.w64 file you just created.
It will take a few minutes for the audio to be processed. Once completed, go through the audio and highlight a region in the Center channel (usually the third stream in 5.1 sources) that has primarily dialogue (no music or sound effects).
-> Make sure to only select the center channel, otherwise, all six channels will be averaged and you will get an inaccurate value. Then click Process->Normalize.
-> Click the Average RMS level (loudness) radio button and then press Scan Levels. After a few seconds, a value should show up for the RMS (underneath the Scan Levels button). Write down/remember this value. Now click Cancel. Make sure to click Cancel and not OK, otherwise Sound Force will normalize the audio.
Now click File->Save As. Make sure "Dolby Digital AC-3 Pro" is selected and the "5.1 Surround DVD" profile is selected.
Now click the "Custom..." button.
-> On the first tab, make sure the settings match the image. Then set the Dialog normalization to the RMS value you wrote down earlier or -31 dB if it was lower. Select 640 kbps for a 1080p/720p encode or 448 kbps for an SD encode.
Now go to the Preprocessing tab.
-> Tick LFE low-pass filter, Bandwidth low-pass filter and uncheck all the other boxes. Make sure that RF overmodulation protection is unchecked. For the Line mode profile, the recommended value is "Film: Light".
Quote:
| Note: Line mode profile is a kind of Dynamic Range Control metadata. It doesn't modify the audio stream but embeds a flag in the audio stream suggesting which profile should be applied by the receiver. Users with headphones and 2.0 systems which cannot comfortably render the full dynamic range will benefit from it if they choose to enable it, while users with 5.1 systems can choose to disable it in their AV receivers for the full cinematic experience. Note that the original audio track (eg. TrueHD) normally also includes a DRC flag which is discarded on transcoding with eac3to. [Film Light Profile] Max Boost: 6 dB (below –53 dB) Boost Range: –53 to –41 dB (2:1 ratio) Null Band Width: 20 dB (–41 to –21 dB) Early Cut Range: –26 to –11 dB (2:1 ratio) Cut Range: –11 to +4 dB (20:1 ratio) www.dolby.com/us/en/technologies/a-guide-to-dolby-metadata.pdf |
Simplified way (Dolby Surcode Encoder):
Installation
> eac3to 3.34
> Surcode Encoder Install the software. Copy-paste the crack to installdir then run it.
How to use:
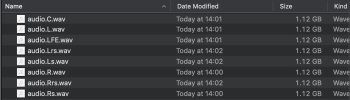
-> You will need to get individual WAV files for each channel, using the aforementioned .wavs extension. Each wav will be labeled with the proper channel. As an example:

-> Load the .wavs in the encoder
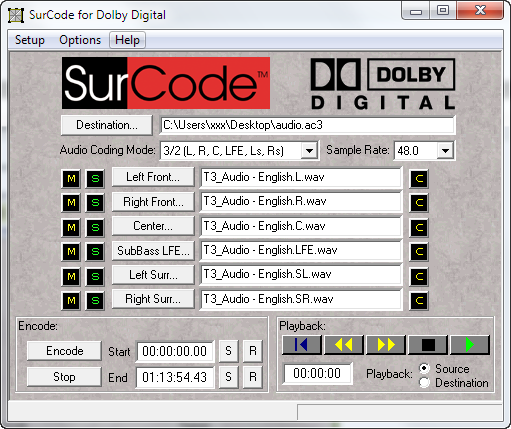
-> Go to Options > Encode Options and set as below (changing bitrate as necessary; you don't need 640 for less than 6 channels)
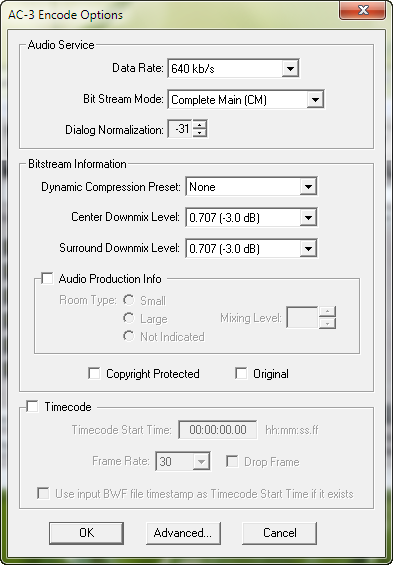
-> From the Encode Options window, go to Advanced... and set as below
[img]https://images3.imgbox.com/a6/a2/crbtWPhE_o.PNG[/url]
-> Hit the encode.
E-AC3 encoding with MacOS:> eac3to 3.34
> Surcode Encoder Install the software. Copy-paste the crack to installdir then run it.
How to use:
-> You will need to get individual WAV files for each channel, using the aforementioned .wavs extension. Each wav will be labeled with the proper channel. As an example:
Code:
| eac3to input.thd output.wavs |
-> Load the .wavs in the encoder
-> Go to Options > Encode Options and set as below (changing bitrate as necessary; you don't need 640 for less than 6 channels)
-> From the Encode Options window, go to Advanced... and set as below
[img]https://images3.imgbox.com/a6/a2/crbtWPhE_o.PNG[/url]
-> Hit the encode.
Things you need:
1. The Disc/Atmos audio
2. eac3to
3. Mac OSX (Virtual Machine/native system)
4. Dolby Media Encoder (Included with Dolby Media Producer Suite)
5. Patience
## How to install Mac OSX
There's a guide which can be found https://techsviewer.com/install-macos-sierra-vmware-windows/ here.
DolbyMediaSuite.dmg
Unpack > Mount > Install
If you need help installing check google or seek an expert's help. I cannot help you with VM setup.
##Getting the audio
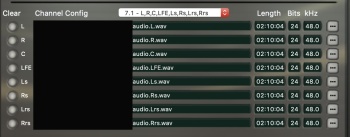
-> You will need to get individual WAV files for each channel, using the aforementioned .wavs extension. Each wav will be labeled with the proper channel. As an example:
The command is easy, "eac3to inputaudio.thd audio.wavs" which will give you 8 .wav files in the cmd directory for 8 channels and 6 for 6 channels (No BL -> Lrs , BR -> Rrs channels)
## Dolby Media Encoder
Start by renaming some of the .wavs:
SL -> Ls
SR -> Rs
BL -> Lrs
BR -> Rrs
In Dolby Media Encoder select Dolby Digital Plus for the profile and the target should be Blu-ray Disc.
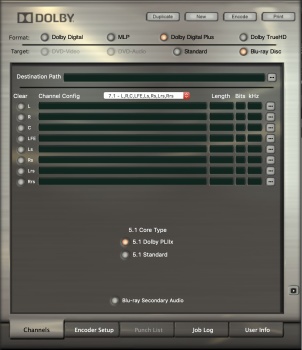
Drag your left channel in and the rest should autofill.
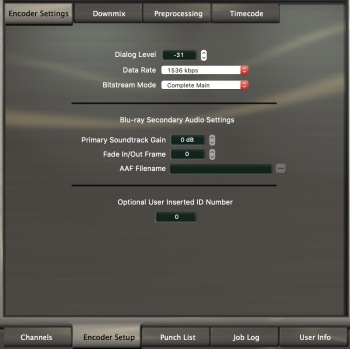
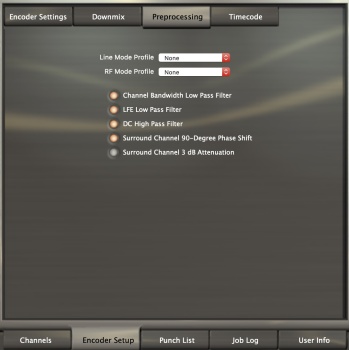
In encoder setup, select 1536 kbps. Choose preprocessing and select none on both dropdowns.
Start the encode.
DTS-HD MA encodes with DTS-HD MA Master Suite:1. The Disc/Atmos audio
2. eac3to
3. Mac OSX (Virtual Machine/native system)
4. Dolby Media Encoder (Included with Dolby Media Producer Suite)
5. Patience
## How to install Mac OSX
There's a guide which can be found https://techsviewer.com/install-macos-sierra-vmware-windows/ here.
DolbyMediaSuite.dmg
Unpack > Mount > Install
If you need help installing check google or seek an expert's help. I cannot help you with VM setup.
##Getting the audio
-> You will need to get individual WAV files for each channel, using the aforementioned .wavs extension. Each wav will be labeled with the proper channel. As an example:
Code:
| eac3to input.thd output.wavs |
The command is easy, "eac3to inputaudio.thd audio.wavs" which will give you 8 .wav files in the cmd directory for 8 channels and 6 for 6 channels (No BL -> Lrs , BR -> Rrs channels)
## Dolby Media Encoder
Start by renaming some of the .wavs:
SL -> Ls
SR -> Rs
BL -> Lrs
BR -> Rrs
In Dolby Media Encoder select Dolby Digital Plus for the profile and the target should be Blu-ray Disc.
Drag your left channel in and the rest should autofill.
In encoder setup, select 1536 kbps. Choose preprocessing and select none on both dropdowns.
Start the encode.
Installation
> eac3to 3.34
> Java Runtime SE 6
> DTS-HD Master Suite Install the software. Runthe file MAS-SAS_Authorizer.exe and enter the serial number from keygen.
How to use:
-> You will need to get individual WAV files for each channel, using the aforementioned .wavs extension. Each .wav will be labeled with the proper channel. As an example:
-> Load the .wavs in the encoder and select the settings shown below.

-> Select 1509 kbps of core bitrate for surround track (Or 255 kbps for each channel rounded to nearest value available) then start the encode.
> eac3to 3.34
> Java Runtime SE 6
> DTS-HD Master Suite Install the software. Runthe file MAS-SAS_Authorizer.exe and enter the serial number from keygen.
How to use:
-> You will need to get individual WAV files for each channel, using the aforementioned .wavs extension. Each .wav will be labeled with the proper channel. As an example:
Code:
| eac3to input.thd output.wavs |
-> Load the .wavs in the encoder and select the settings shown below.
-> Select 1509 kbps of core bitrate for surround track (Or 255 kbps for each channel rounded to nearest value available) then start the encode.
I thought this was a pretty interesting read when it comes to this topic. Thank you
ReplyDeleteSound Forge Pro Mac Crack
Nova Launcher Prime APK Crack
up4crack.net
I like your all post. You have done really good work. Thank you for the information you provide, it helped me a lot. I hope to have many more entries or so from you. Very interesting blog. ALSO Visit
ReplyDeleteNova Launcher Prime APK Crack
up4crack.net
Amazing blog! I really like the way you explained such information about this post with us. And blog is really helpful for us this website
ReplyDeleteNova Launcher Prime APK Crack
up4crack.net
Amazing blog! I really like the way you explained such information about this post with us. And blog is really helpful for us this website
ReplyDeleteNova Launcher Prime APK Crack
up4crack.net
Great set of tips from the master himself. Excellent ideas. Thanks for Awesome tips Keep it up
ReplyDeleteNova Launcher Prime APK Crack
up4crack.net
I like your all post. You have done really good work. Thank you for the information you provide, it helped me a lot. I hope to have many more entries or so from you.
ReplyDeleteVery interesting blog.
beecrack.com
sound-forge-pro Crack
Very good article! We will be linking to this particularly great post on our website. Keep up the good writing.
ReplyDeleteNova Launcher Prime APK Crack
up4crack.net
I am very thankful for the effort put on by you, to help us, Thank you so much for the post it is very helpful, keep posting such type of Article.
ReplyDeleteADVANCED Codecs Crack
IDM Crack
Well!! I am impressed by your post. It turns me on. Please, keep writing these posts, so that i could keep myself engaged.
ReplyDeleteDirectory Opus Crack
Directory Lister Crack
CopyTrans Cloudly Crack
ConnectWise Control Crack
Nice Post
ReplyDeleteVMware Workstation Player Crack
Stellar Data Recovery Crack
ImTOO PodWorks Platinum Crack
Directory Opus Pro Crack
Trend Micro Premium Security Crack
Could you re-upload Dolby SurCode Encoder
ReplyDeleteGreetings. Thank your for your interest. We can no longer upload this due to copyright issues in our site. You can easily find this in torrent. Thanks for understanding.
DeleteThis tutorial can always be used as an guide for encoding. Regards,
DeleteNice post
ReplyDelete